Tuesday, October 10, 2006
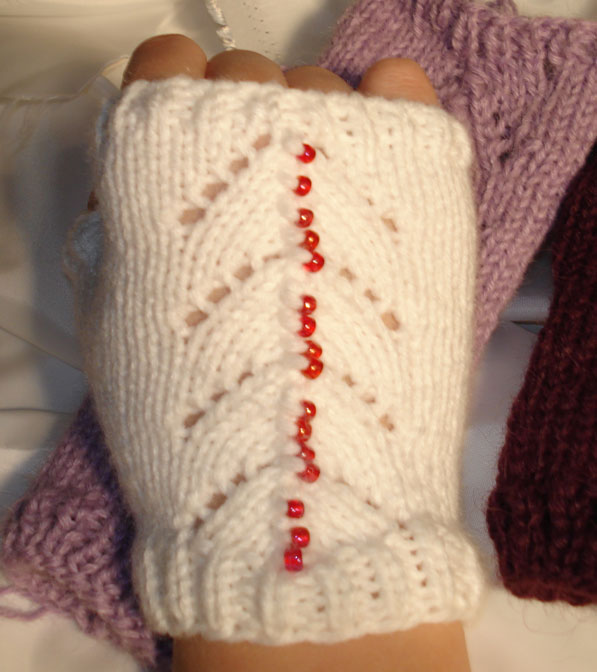
Ok so here is the pattern for those gloves I mentioned. I named them Victoriana because they reminded me of something Victorian....(yes I know, thank you Captain Obvious). This white one I made really shows the pattern, and the option of beads. The other pic in purple is longer in the wrist and no beads. Feel free to play around with it.
You'll need a set of dpns size 3 and some stitch markers, also a stitch holder or some extra yarn. Size medium is probably the size for an average hand. I made mine in small, I have tiny hands.
Gauge is about 24 sts/32 rows = 4" in stockinette stitch. It doesn't have to be exact. The yarns I used were fingering weight held double throughout, a heavier single strand will work.
Some other things to know:
Rib Pattern: (K1, P1) around
Horseshoe Lace Pattern (Adapted from Barbara Walker’s First Treasury)
All odd rows knit or for beaded version pull a bead through on each fifth stitch after the pattern marker on the right glove and each sixth stitch on the left glove. You have to place the bead on the knit row and not the pattern row because the bead will be on the center stitch in the pattern. This is the one that will be slipped and then passed over on the following row.
Right Glove:
Row 1 and all odd rows knit
Row 2: k1, yo, k3, sl1-k2tog-psso, k3, yo, k2
Row 4: k2, yo, k2, sl1-k2tog-psso, k2, yo, k3
Row 6: k3, yo, k1, sl1-k2tog-psso, k1, yo, k4
Row 8: k4, yo, sl1-k2tog-psso, yo, k5
Left Glove:
Row 1 and all odd rows knit
Row 2: k2, yo, k3, sl1-k2tog-psso, k3, yo, k1 
Row 4: k3, yo, k2, sl1-k2tog-psso, k2, yo, k2
Row 6: k4, yo, k1, sl1-k2tog-psso, k1, yo, k3
Row 8: k5, yo, sl1-k2tog-psso, yo, k4
M1: Knit into the purl bump in the back of the next stitch. When you look at your knitting in the back it is actually the top of the stitch below your next stitch. Then you will knit the next stitch as normal. This creates an increase with no holes. Here is a pic: that is the needle after it has been inserted into the purl bump.
Gloves [wrist]
Using Long Tail Method, CO 36[42, 48]. Size small co 12 stitches per needle, size medium co 14 stitches per needle, and size large co 16 stitches on each needle. Join to knit in the round being careful not to twist and knit in rib pattern for 5 rows.
Begin Pattern:
Row 1 (marker row: size small does not need to place pattern markers as all the stitches for the pattern are on the center needle)- Knit 12[15, 18] place marker, k12 for all sizes, place marker, k to end.
Row 2- Knit around to marker, work row 1 of Horseshoe Lace Pattern between markers, knit to end.
Row 3- 9- Work in pattern continuing the Horseshoe Lace Pattern between the markers.
Repeat rows 2-9, 1[1, 1] more time. For a shorter wrist go straight to the thumb gusset.
Begin thumb gusset(right hand):
Row 1 (marker row for thumb gusset)- Work around in pattern until second marker, slip marker, k5[6, 7] and place marker. K3 for all sizes, place marker, k to end.
Row 2- Work around in pattern until first thumb gusset marker. Slip marker, m1, k3, and m1. Slip marker knit to end.
Row 3- Work around in pattern until thumb gusset marker, knit across, slip marker, knit to end.
Row 4- Work around in pattern until first thumb gusset marker, slip marker, and m1 in the first stitch. Knit until last stitch before last marker, m1, knit last stitch before marker; slip marker, k to end.
Row 5- Repeat row 3
(left hand)you will place markers on the first needle instead of the last. So knit 4[5, 6], place marker, k3, place marker and continue in the same manner as you did for the right glove.
Repeat rows 4 and 5 until there are 17[19, 21] stitches between the markers, or a total of 26[30, 34] stitches on your thumb gusset needle, ending with row 5. If you find that there are too many stitches on your thumb gusset needle while you are working you can split them in half and work with all five of your dpns. It makes it so much easier and doesn’t pull your stitches so much.
Next Row- Knit around in pattern until you reach the first thumb gusset marker. Take off marker, m1 in the first stitch; slip the next stitch knit wise, slip the next 14[16, 18] stitches onto stitch holder. Place the first slipped stitch from the right needle back onto the left and k2tog. Knit to end.
Following rows-Work around glove in pattern until there are a total of 5[5.5, 6] repeats of the arrowhead lace. If you have longer fingers you may add one more pattern repeat to the glove than I have written here. Or even half a repeat. Work however many stitches is a comfortable length for you. When you have reached your desired length, ending with a knit row (do not place a bead on the last knit row if you are working the beaded version), work three rows of ribbing and on the third row bind off in pattern.
Finishing the Thumb Gusset:
Distribute the stitches from the stitch holder evenly onto three needles. Pick up two stitches from the glove where you previously joined and knit 4[6, 8] rows, or until the thumb is a comfortable length minus three rows. Then knit two rows in ribbing, and on the third row bind off in pattern.
Weave in all ends and you're done.
Ok so if anyone has any issues with my pattern or I didn't explain anything just let me know!


5 comments:
Thanks for posting this!! I love this pattern and will add it to my list of "things I must knit"!! At least it's something I could knit up in a weekend and won't end up in the pile of unfinished objects! I'll try to let you know how they turn out!
I created a profile so that I could tell you how super duper this pattern is. This is the most complicated pattern I've tried so far, and it turned out beautifully thanks to your clear instructions. I can't wait for you to publish more patterns.
Definitely send me pics guys...I would love to see how they turn out for everyone else in different yarns!
I really like these gloves and was pleasantly surprised when I found that I already "knew" the designer! I was just looking at the Vogue Knitting on the Go Mittens/Gloves book and according to that chart, my hand is their "small". They say "small" is 7" circumference around the hand, just under the knuckles and that XS is 6 1/2". Do you think your S for the pattern is more like the XS or the S going by those measurements?
Beautiful Fingerless gloves...
Thanks for your time to design, write and post your creation.
Take care!
Post a Comment